Introduction to UVM Connect
| Introduction to UVM Connect | |
| Overview | The UVM Connect library provides TLM1 and TLM2 connectivity between SystemC and SystemVerilog models and components. |
| Purpose | UVM Connect enables the following use models, all designed to maximize IP reuse. |
| Key Features | This section enumerates some important characteristics of UVM Connect. |
| Definitions | Definitions for terms used throughout this document. |
| Navigating the documentation | How to navigate the documentation. |
| Using with OVM | UVM Connect 2.2 and greater can be compiled to run with OVM 2.1.1 or greater. |
| Tool platform requirements | This section specifies the requirements for compiling and using the UVMC library and included examples. |
| UVM/ OVM requirements | The latest version requirements |
| Simulator requirements | The latest simulator requirements |
| Portability considerations | There are some places in the source code where the coding had to be done differently for the different vendor simulators listed above. |
| Platform requirements | The latest platform requirements |
| Quickstart 1-2-3 to running examples | |
| Keep it simple | Every attempt was made at keeping required basic steps to running your first example as simple as possible, and consistently so across the 3 supported vendor platforms. |
| 1. ENV setup | First you need to set up the environment for your vendor’s simulator in the recommended fashion for that product. |
| 2. Compiling Libraries | Compiled UVM and UVMC libraries are required before you can run the examples. |
| 3. Running a UVMC example | All examples can be found in the $UVMC_HOME/examples directory. |
| Limitations | |
| SV TLM Limitations | TLM2 features not fully implemented in UVM |
| Starting SC & SV | Issues associated with starting SystemC and SystemVerilog |
| About the examples | The examples included in this kit show how UVMC can be used to integrate IP in a mixed SC and SV environment, without modifying existing IP. |
| Categories | The UVM Connect kit provides examples in 6 major categories--connections, converters, field type support, UVM commands, XLerated connections, config extensions. |
| More details about compiling libraries and running examples | This section describes more about how to run the examples included in this kit. |
| Mind your ENV | It is important that you consistently set the values for UVM_HOME and UVMC_HOME for compiling and running examples and for compiling the libraries themselves. |
| Environment setup template script | If you would like further guidance on a good template script that can be used for environment setups, this section details a template for environment setups that will work for all examples in included in this package and can even be used when building special target libraries, using different vendor simulators. |
| Other options for compiling libraries | For building libraries for your specific vendor, here are the common targets which you’ll see printed out from the “make help” command when executing in $UVMC_HOME/lib/Makefile.<vendor tool>. |
| Running the examples outside the install tree: | To run the examples outside the UVMC_HOME install tree, all four environment variables must be defined either as environment variables or via the make command line. |
| Running all the examples as a regression test | If you would like to set up a simple regression harness to run the entire suite of UVMC examples that comes with the package please see the section entitled Regression testing below. |
| Support for alternative simulator engines | |
| Compiling Standalone SystemC Libraries | In addition to support for native Questa (and VCS and IUS) compiled SV and SystemC libraries, support was also added for standalone libraries that can be used with alterate SystemC-only engines, namely OSCI SystemC and Mentor Vista SystemC. |
| References | A partial list of sources for information on SystemC, SystemVerilog, UVM, and related topics |
| Copyright | |
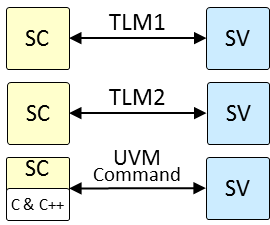
Overview
The UVM Connect library provides TLM1 and TLM2 connectivity between SystemC and SystemVerilog models and components. It also provides a UVM Command API for accessing and controlling UVM simulation from SystemC (or C or C++).
Purpose
UVM Connect enables the following use models, all designed to maximize IP reuse.
| Abstraction Refinement | Reuse your SC architectural models as reference models in SV verification. |
| Expansion of VIP Inventory | More off-the-shelf VIP is available when you are no longer confined to VIP written in the language of your testbench. |
| Leveraging each language | Each language has its strengths. You can leverage SV’s powerful constraint solvers and UVM’s sequences to provide random stimulus to your SC architectural models. And you can leverage SC’s speed and capacity for verification of untimed or loosely timed system-level environments. |
| Direct access to UVM | The UVM Command API provides a means to wait for UVM phase transitions, raise and drop objections to phase transitions, set and get configuration, issue UVM-formatted reports, set report filters, print UVM topology, set factory overrides by instance and type, and more. |
The UVM Connect library makes connecting TLM models in SystemC and UVM in SystemVerilog a relatively straightforward process. However, because UVM Connect is effectively integrating several technologies, you’ll need to have basic knowledge of SystemC, SystemVerilog, and the UVM, and TLM standards. Refer to the References section for a partial list of relevant documentation. You may also wish to read the brief TLM Review included in this documentation.
Key Features
This section enumerates some important characteristics of UVM Connect.
| Simplicity | Object-based data transfer is accomplished with very little preparation needed by the user. |
| Optional | The UVM Connect library is provided as a separate, optional package to UVM. You do not need to import the package if your environment does not require cross-language TLM connections or access to the UVM Command API. |
| Works with Standard UVM | UVM Connect works with the free, open-source Accellera UVM 1.1d and later. With a small modification, UVM Connect can work with previous UVM open-source releases. |
| Enhances native modeling methodology | UVM Connect does not impose a foreign methodology nor require your models or transactions to inherit from a base class. Your TLM models can fully exploit the features of the language in which they are written. |
| Supports existing models | Your existing TLM models in both SystemVerilog and SystemC can be reused in a mixed-language context without modification. |
| Reinforces TLM modeling standards | The UVM Connect reinforces the principles and purpose of the TLM interface standard--enabling independently designed models to communicate without directly referring to each other. Such models become highly reusable. They can be integrated in both native and mixed-language environments without modification. See TLM Review for an introduction to TLM concepts and principles. |
Definitions
Definitions for terms used throughout this document.
| SV | Short for SystemVerilog, or UVM in SystemVerilog. The context will make clear which. In figures, UVM SV components are shown in shades of blue. |
| SC | Short for SystemC. In figures, SC components are shown in shades of yellow. |
| model | Functionality encapsulated by a class. A model is typically a subtypes (derived from) of sc_module in SC and uvm_component in SV. Although dynamic in nature, models deriving from these classes are quasi-static; they are created during elaboration of the testbench and continue to exist throughout simulation. |
| component | Synonymous with model, above. |
| hierarchical component | A model that contains one or more models. The hierarchical component is often referred to as the parent of the sub-components, which are referred to as its children. |
See TLM Review for definitions of TLM-related concepts and terms.
Navigating the documentation
How to navigate the documentation.
Click a major heading on the navigation bar at left to expand or collapse the list of items under that heading.
Each page in a major topic or adaptor class is summarized in a box like the one at the top of this page. Each heading or method has a one-line summary description for easy reference. Clicking on the heading or method will take you to its full description.
Clicking on the title of the summary box or full description heading will take you to the actual source file, if available.
Click on Index to look up a class or method name whose absolute location is unknown, or you can enter a keyword in the Search box to see a list of matches.
Using with OVM
UVM Connect 2.2 and greater can be compiled to run with OVM 2.1.1 or greater. First, you must set an environment variable, OVM_HOME, to point to a valid OVM release. Then, to compile the OVM and OVMC libraries for 32 and 64 bit Linux, do the following
cd $UVMC_HOME/lib
make -f Makefile.<tool> OVM=1 all
Where tool is the name of the simulator you are using.
Now, try running an example from the OVM-specific examples_ovm directory.
cd $UVMC_HOME/examples_ovm/connections
make -f Makefile.<tool> sv2sc
Tool platform requirements
This section specifies the requirements for compiling and using the UVMC library and included examples.
UVM/ OVM requirements
The latest version requirements
| UVM | 1.1d or later (earlier versions possible) |
| OVM | 2.1.1 or later |
The latest version of UVM can be downloaded from Accellera. (http://www.accellera.org- /activities- /committees- /vip)
OVM can be downloaded from (http://www.verificationacademy.com).
UVM 1.1d adds a simple accessor method to uvm_port_base #(IF) for getting the interface mask of the port that is required by UVMC:
376a374,377
>   function int m_get_if_mask();
>     return m_if_mask;
>   endfunction
You can get back versions of UVM (1.0p1 or UVM-1.1) to work with UVM Connect by adding this method to the uvm_port_base #(IF) class in UVM_HOME/src/base/uvm_port_base.svh. You can make the edit directly in the source file, or you can replace the source file with the one included the UVM_HOME/compatibility directory in this kit. No other changes have occurred in this file between UVM 1.0p1 and 1.1d, so it is OK to replace the whole file.
No version of OVM has this accessor method, so port mask compatibility checks are not possible with any OVM release out-of-box. However, like UVM, you can enable port compatibility checks by replacing the file at OVM_HOME/src/base/ovm_port_base.svh with the file contained in the UVMC_HOME/compatibility directory.
Simulator requirements
The latest simulator requirements
| Mentor Questa | 10.3 or later recommended / gcc 4.5.0 (Linux) |
| Synopsys VCS | 2014.03-SP1 / gcc 4.7.2 (Linux) |
| Cadence IUS | 14.10 / gcc 4.4.5 (Linux) |
UVMC is intended to work with all simulators--it uses standard SV, using only DPI-C behind the scenes. No simulator-specific use models are demonstrated by the examples, but that does not mean those use models are not possible with UVM Connect. For example, most simulators support SV-instantiates-SC and SC-instantiates-SV use models, but these are implemented differently by each vendor. The examples in this kit can be easily converted to employ those use models.
Despite UVM-Connect having been developed on the Mentor Questa simulator, based on end-user feedback, very minor modifications were needed to enable UVM Connect to run on Synopsys’ VCS and Cadence’s Incisive simulators. The tool-specific makefiles included in this release were well tested and are known to work on the given simulator version, but they may not represent best practice or recommended use models for those simulators. For tool-specific issues and questions, please consult the appropriate vendor.
The UVMC library is intended to be portable across all simulators. If you had to make changes to the UVMC library source to accommodate your simulator, please let Mentor know via Verification Academy (http::/verificationacademy.com), your field representative(s), or Mentor’s general support line.
Portability considerations
There are some places in the source code where the coding had to be done differently for the different vendor simulators listed above.
In particular for the “fast packer” converters, techniques for passing dynamic arrays by reference across the language boundary varied among the different vendor simulators. In some cases special extra code had to be added for the VCS and IUS simulators that was not needed for Questa.
To handle such cases you will see use of the following compiler directives for the SystemVerilog source files (src/connect/sv),
`ifdef VCS   # For Synopsys VCS specific code
`ifdef INCA  # For Cadence IUS specific code (auto-defined by analyzer)
`ifdef VCS_OR_INCA  # For VCS or IUS specific code
and the following for SystemC source files (src/connect/sc),
#ifdef VCS          # For Synopsys VCS specific code
#ifdef NCSC         # For Cadence IUS specific code
#ifdef VCS_OR_NCSC  # For VCS or IUS specific code
See comments in affected source code modules for more details of simulator specific concerns - particularly in the TLM GP packer/converter code (sc/uvmc_converter.svh, sv/uvmc_xl_converer.svh, sc/uvmc_tlm_gp_converter.cpp, sc/uvmc_xl_converter.cpp).
Platform requirements
The latest platform requirements
| Mentor Questa | At present, only Linux 32 and 64-bit platforms are supported. Specific OS and version support is the same as with Questa. |
| Synopsys VCS | Linux 32/64. Unknown arch/OS/version support. Consult vendor. |
| Cadence IUS | Linux 32/64. Unknown arch/OS/version support. Consult vendor. |
Keep it simple
Every attempt was made at keeping required basic steps to running your first example as simple as possible, and consistently so across the 3 supported vendor platforms.
Care was taken to use vendor provided UVM libraries where possible and, in the case of Questa, to even use the pre-built Questa UVM libraries to minimize the number of steps required for a basic example bringup.
More advanced options for compiling and building libraries are also presented later in More details about compiling libraries and running examples but this section will focus on the bare minimum number of steps required to run one of the example simulations.
The steps outlined below are identical for the 3 platforms and are summarized as follows:
- 1. Set approriate ENV vars and customary vendor tool environment
- 2. Build UVMC library
- 3. Run UVMC example
1. ENV setup
First you need to set up the environment for your vendor’s simulator in the recommended fashion for that product. If you know how to do this, the additional environment variables you will need to set for UVM and UVMC are shown below.
To run any example, you need compiled UVM and UVMC libraries.
The following environment variables should be set before compiling the UVM and UVMC libraries (if needed), and before running the examples included in this kit.
| PATH | Your simulator should be included in your PATH and meet the minimum version requirements stated earlier. If you need to (or plan to) compile the UVM Connect and/or UVM libraries, your path may also need to point to a GCC compiler supported by the simulator. Refer to your simulator documentation for such requirements. |
| UVM_HOME | The location of the UVM source distribution that meets the minimum version requirements. See UVM/OVM requirements for details. This path is needed for compiling the UVM library, and for locating the uvm_macros.svh file when compiling the examples. |
| UVMC_HOME | The location of the UVMC library source. This is needed when compiling the UVMC library from outside the install directory. It is also needed for locating the UVMC’s SC headers and SV’s uvmc_macros.svh when compiling the examples. |
| UVM_LIB | Specifies the location to put the compiled UVM library Default: $UVMC_HOME/lib/uvmc_lib. If you’re using Questa you can point to one of the pre-compiled UVM_LIB’s in the Questa release. |
| UVMC_LIB | Specifies the location to put the compiled UVMC library Default: $UVMC_HOME/lib/uvmc_lib. If you’re using Questa you can point to one of the pre-compiled UVMC_LIB’s in the Questa release. |
If your vendor supplies UVM source code and/or pre-compiled UVM libraries, you can simply set UVM_HOME, UVM_LIB accordingly.
If you have a writable installation of the UVMC kit, you can compile the libraries and examples directly within the UVMC tree. In this case, you only need to specify the UVMC_HOME environment variable and UVMC_LIB will automatically defined to point under there.
Alternatively, you can point UVMC_HOME, UVM_HOME to “read-only” areas and compile either or both libraries to your own areas by setting UVMC_LIB and/or UVM_LIB.
For example, here is the simplest recommended way to set up your ENV for the Questa environment,
# Set up PATH and MGC_HOME as is customary for Questa simulator setup

setenv UVM_HOME $MGC_HOME/verilog_src/uvm-1.1d # Source area for UVM macros
setenv UVM_LIB $MGC_HOME/uvm-1.1d              # This is pre-compiled !
setenv UVMC_HOME <path to your UVMC install dir>
setenv UVMC_LIB <local path to your desired UVMC target library>
It is possible to override the environment variable settings via Makefile arguments of the same name. This is not recommended because it will be easy to inadvertently compile libraries and examples using different paths.
See the section Mind your ENV for additional suggestions on how to create reusable scripts to set up your environment in a consistent way.
2. Compiling Libraries
Compiled UVM and UVMC libraries are required before you can run the examples. Compilation is done separately from the examples in accordance with standard practice.
Assuming you’ve set your ENV vars to use pre-existing UVM libriares as recommend above and you’ve also set your UVMC_HOME to your UVMC installation area and UVMC_LIB to target library area as recommended above, then, to build both 32 and 64 bit libraries simply do the following,
make -f $UVMC_HOME/lib/Makefile.<vendor tool> uvmc # Makes 32 and 64 bit libs
where vendor tool is one of “questa”, “vcs”, or “ius”.
A couple of other options,
# Remove all target compiled library directories
make -f $UVMC_HOME/lib/Makefile.<vendor tool> clean

# Print out detailed help information
make -f $UVMC_HOME/lib/Makefile.<vendor tool> help

# Build 64 bit library only
make -f $UVMC_HOME/lib/Makefile.<vendor tool> uvmc64
3. Running a UVMC example
All examples can be found in the $UVMC_HOME/examples directory.
In each of the examples below assume the command make is replaced with make -f Makefile.<vendor tool> as explained above. Alternatively you can just change the Makefile links you see in each example directory to point to your vendor’s Makefile. By default, the Makefile links initially point to Makefile.questa.
After following steps above to set up your ENV and compile your UVMC library, it is recommended that you make first a local copy of the examples directory,
cp -p -R $UVMC_HOME/examples .
Let’s now run the phasing example test under examples/commands,
cd examples/commands
make phasing # Runs actual simulation of 'phasing' test.
All other examples in the suite follow a similar pattern.
See About the examples for a detailed description of all flavors of examples available. The rest of this document also goes into considerable detail about them for each category.
Other options,
make help  # Prints out help message for running tests.
make all   # Runs all tests under particular examples/<category>/ directory.
make clean # Cleans out all generated simulation db files from previous runs.
You can also combine targets in one command line,
make clean phasing
SV TLM Limitations
TLM2 features not fully implemented in UVM
- Transport debug interface - tlm_transport_dbg_if
- Direct member interface - tlm_fw_direct_mem_if, tlm_bw_direct_mem_if
- Core initiator and target sockets - UVM provides sockets that provide blocking or non-blocking transport, but not both.
- Quantum keeper
- Payload event queue
- Instance-specific extensions
Should your SC models rely on SV-side implementation of these interfaces, further adaptation may be required to achieve successful interoperability.
There are also several limitations in the current UVM implementation.
- The core sockets in standard TLM2, tlm_initiator_socket and tlm_target_socket, have no direct counterpart in UVM SV. The standard defines initiator and target sockets that use/implement both the b_transport and nb_transport interfaces. UVM defines sockets that implement either blocking or non-blocking but not both. UVM Connect will still allow connections from SC initiator sockets to SV target UVM sockets, but a run-time fatal error will occur if a blocking call is made to a non-blocking UVM socket (e.g. uvm_tlm_nb_target_socket) or a non-blocking call is made to a blocking UVM socket (e.g. uvm_tlm_b_target_socket). Refer to Mantis 3682 (http://www.eda.org/svdb/view.php?id=3682)
- The uvm_tlm_generic_payload needs several fixes. Refer to (http://www.eda.org/svdb/view.php?id=3983)
- UVM does not fully implement TLM1 non-blocking interfaces. The ok_to_put, ok_to_get, and ok_to_peek methods are defined in the standard to return an event that is triggered once the non-blocking port is able to complete a put, get, or peek operation, respectively. Calls to these interface methods by connected SC-side ports will produce a run-time error and return an event that will never trigger.
Starting SC & SV
Issues associated with starting SystemC and SystemVerilog
SystemC typically elaborates and begins simulation before SystemVerilog has completed elaboration. If the SC side attempts to communicate with SystemVerilog too early, you may get run-time errors or undefined behavior. SC-side ports that are bound to SV-side exports or imps are especially vulnerable to this condition. UVM Connect tries to prevent this from happening in two different ways:
- All UVM Command functions block until SV is ready
- All SC-side calls to TLM ports that are registered for connection across the language boundary will block until its cross-language connection is made.
The implication is that UVMC TLM and Command calls must be made from an SC thread process.
About the examples
The examples included in this kit show how UVMC can be used to integrate IP in a mixed SC and SV environment, without modifying existing IP.
Before attempting to run the examples, be sure to review the Quickstart 1-2-3 to running examples section. Check for support for your platform, confirm that the UVM and UVMC libraries are compiled, and make sure your environment variables are set properly.
Categories
The UVM Connect kit provides examples in 6 major categories--connections, converters, field type support, UVM commands, XLerated connections, config extensions.
| Connections | Shows how to establish TLM connections across the language boundary. If you are not using the TLM generic payload transaction type, you will also need to define a converter for your transaction. See Connection Examples |
| Converters | Provides examples of writing (or generating) transaction converters. See Converter Examples |
| Field Types | Shows how to pack/unpack each data type that can be declared members (properties, or fields) of your transaction. See Type-Support Examples |
| UVM Commands | Demonstrates use of the UVM Command API for accessing and controlling UVM simulation from SystemC. For example, you can set configuration, override the factory, issue reports, and control phase progression from outside SV using this API. See UVM Command Examples |
| XLerated Connections | Similar to connections but shows usage of the “fast packer” type converters that can be used with passing TLM generic payloads (TLM GPs) over UVM TLM-2 and SystemC TLM-2.0 socket connections when support for unlimited payloads and improved performance is desired. See Fast packer converters. |
| Config extensions | Demonstrates use of configuration extensions to TLM 2.0 generic payloads (TLM GPs) to convey static configuration info or sideband information that can accompany a TLM GP. See Configuration extensions. |
More details about compiling libraries and running examples
This section describes more about how to run the examples included in this kit.
Mind your ENV
It is important that you consistently set the values for UVM_HOME and UVMC_HOME for compiling and running examples and for compiling the libraries themselves. The best way to ensure this is to define the environment variables once, perhaps using a shell script or .cshrc file.
# Setting required UVM and UVMC environment variables...
source my_uvmc_setup.sh

cd $UVMC_HOME/lib
make clean all

cd ../examples/commands
make all
cd ../converters
make all
...
Environment setup template script
If you would like further guidance on a good template script that can be used for environment setups, this section details a template for environment setups that will work for all examples in included in this package and can even be used when building special target libraries, using different vendor simulators. Additionally it can be used as part of an automated procedure to regression test all the package examples (see Running all the examples as a regression test section below).
In each of the example test directories as well as in the $UVMC_HOME/lib/ you’ll see a local Env.script present. You can run the tests in that individual directory by just manually sourcing the Env.script. This is an alternative technique to setting up the environment on your own as was detailed in the Quickstart 1-2-3 to running examples section above.
If you do choose the Env.script method, you’ll notice each Env.script identifies the tools it needs by setting env_* variables that act as “switches” to identify which tools that test needs then sourcing a master .toolsrc script as shown here in a sample Env.script,
setenv env_gcc  # GCC compiler setup

#Choose one of these (but not all 3):
setenv env_questa  # Mentor Questa setup
#setenv env_vcs     # Synopsys VCS setup
#setenv env_ius     # Cadence IUS setup

setenv env_uvm  # UVM_HOME setup

setenv env_sysc  # OSCI SystemC
setenv env_vista # Vista SystemC

# $DEMO_ROOT must be set to a directory containing .toolsrc
#   customized to your tool's environment
# Example: setenv DEMO_ROOT $UVMC_HOME/examples/.toolsrc
if( $?DEMO_ROOT ) source $DEMO_ROOT/.toolsrc
The Env.script references a “master” .toolsrc env setup file by referencing the env variable DEMO_ROOT. So simply set this variable to a directory containing a .toolsrc that has been suitably customized for your site.
You will find a well tested template $UVMC_HOME/examples/.toolsrc that can be customized to your site settings for the required tool environments mentioned above. Simply search for the pattern, SITE SPECIFIC and change the variables enclosed by those blocks to your specific site settings.
Other options for compiling libraries
For building libraries for your specific vendor, here are the common targets which you’ll see printed out from the “make help” command when executing in $UVMC_HOME/lib/Makefile.<vendor tool>.
In all cases below assume ‘make <target>’ really means,
make -f $UVMC_HOME/lib/Makefile.<vendor tool> <target>
For example to print help using ‘questa’ vendor Makefile,
make -f $UVMC_HOME/lib/Makefile.questa help
You can combine targets to build more than one library.
make uvmc      # makes both uvmc32 and uvmc64
make uvmc32    # make UVM Connect (uvmc_pkg) 32b
make uvmc64    # make UVM Connect (uvmc_pkg) 64b

make ovmc      # makes both ovmc32 and ovmc64
make ovmc32    # make UVM Connect for OVM (ovmc_pkg) 32b
make ovmc64    # make UVM Connect for OVM (ovmc_pkg) 64b
To build a custom UVM/OVM, override the built-in library distributed with Questa, specify one or more of the following targets before any of the uvmc/ovmc targets above. You must define UVM_HOME (or OVM_HOME) when using these targets.
make uvm       # makes both uvm32 and uvm64
make uvm32     # make UVM lib (uvm_pkg) 32b (override built-in)
make uvm64     # make UVM lib (uvm_pkg) 64b (override built-in)

make ovm       # makes both ovm32 and ovm64
make ovm32     # make OVM lib (ovm_pkg) 32b (override built-in)
make ovm64     # make OVM lib (ovm_pkg) 64b (override built-in)
The recommended usage is to build 32/64-bit libraries for UVM Connect, using a built-in UVM from your vendor,
make uvmc
Here’s an alternate usage example for building 64 bit libraries for both UVM and UVM-Connect,
make uvm64 uvmc64 UVM_HOME=<path-to-UVM-source>
Presently, the Makefiles are written for compilation on Linux platforms. Future releases may provide make targets for Windows compilation, subject to simulator support for that platform.
Running the examples outside the install tree:
To run the examples outside the UVMC_HOME install tree, all four environment variables must be defined either as environment variables or via the make command line. See Quickstart 1-2-3 to running examples for details.
Each example directory relies on a master common Makefile in the examples/common directory. Copy the entire examples directory from the install location into a local, writable area, perhaps in your HOME directory or a shared workspace. Then cd to any subdirectory and run make as before, for example,
cp -p -R $UVMC_HOME/examples .
cd examples/commands
make phasing # Runs actual simulation of 'phasing' example test.
Running all the examples as a regression test
If you would like to set up a simple regression harness to run the entire suite of UVMC examples that comes with the package please see the section entitled Regression testing below. That section goes into considerable detail on environment setups that will work for all examples in included in this package and can be used to drive automated regression test procedure.
Compiling Standalone SystemC Libraries
In addition to support for native Questa (and VCS and IUS) compiled SV and SystemC libraries, support was also added for standalone libraries that can be used with alterate SystemC-only engines, namely OSCI SystemC and Mentor Vista SystemC.
Even Questa can be used with a standalone library for SystemC-only use models of UVM-Connect (see Release Notes - UVM Connect about support for SC <-> SC peer UVM-Connect’ions).
You will find special Makefile’s for the standalone libraries here,
$UVMC_HOME/lib/
  Makefile.uvmc_sysc_standalone_questa
  Makefile.uvmc_sysc_standalone_osci
  Makefile.uvmc_sysc_standalone_vista
These each build a library called uvmc.so which can be directly linked into the Questa, OSCI SystemC or Vista SystemC kernel programs respectively.
NOTE: For the case of OSCI and Vista this assumes SV-UVM is not even being used. In fact, the SV-UVM infrastructure is completely removed from these libraries. They only support peer SC <-> SC UVM-Connect’ions for these use models.
To build each of these libraries first, make sure you properly set up your normal OSCI SystemC or Vista environments (with appropriate gcc or vista_g++ env setup as well).
For further guidance on a good .toolsrc template script that can be used for alternate SystemC simulator environment setups, please see the section entitled Environment setup template script earlier in this chapter.
That section goes into considerable detail on environment setups that can be used when building special target libraries. You’ll find a good customizeable .toolsrc template under the $UVMC_HOME/lib directory.
It is important to make sure the correct $UVMC_BUILD_PLATFORM is set depending on which gcc you’re using and 32 vs 64 bit builds (again see .toolsrc template for guidance).
Assuming you’ve made the documented adjustments to your .toolsrc template described in the section for native vendor simulator, OSCI SystemC, and/or Vista SystemC environments (with appropriate gcc/g++ or vista_g++ env setup as well), you can now follow this procedure to build the standalone libraries,
setenv MTI_VCO_MODE 64 # for 64 bit platforms, or '32' for 32 bit platforms

cd $UVMC_HOME/lib/
source Env.script # Which references the pre-customized .toolsrc template

# For Questa SystemC standalone lib ...
gmake -f Makefile.uvmc_sysc_standalone
# For OSCI SystemC standalone lib ...
gmake -f Makefile.uvmc_sysc_standalone_osci
# For Vista SystemC standalone lib ...
gmake -f Makefile.uvmc_sysc_standalone_vista
NOTE: You can continue to use the default way of building UVMC libraries for Questa (or VCS or IUS) SystemC+SV-UVM applications. Standalone libraries are not needed in this case and the builds of them do not interfere with the “normal” way of building UVM-Connect libraries.
You will see the resulting libraries placed in the following directories,
lib/
  questa/
    <platform dir>/
  osci/
    <platform dir>/
  vista/
    <platform dir>/
The <platform dir>/ areas are directory names formed by the setting of $UVMC_BUILD_PLATFORM which has a naming convention that accounts for 32 vs. 64 bit and what GNU gcc/g++ version is used.
References
A partial list of sources for information on SystemC, SystemVerilog, UVM, and related topics
- [1] Standard SystemC Language Reference Manual; IEEE 1666-2011, March 8, 2011. http://standards.ieee.org- /getieee- /1666- /download- /1666-2011.pdf
- [2] IEEE Standard for SystemVerilog-Unified Hardware Design, Specification, and Verification Language; IEEE 1800-2009; December 11, 2009
- [3] OSCI TLM 2.0 Language Reference Manual, version TLM 2.0.1, Document JA32; copyright Open SystemC Initiative, July 2009 (absorbed into [1] above)
- [4] Universal Verification Methodology (UVM) Accellera; http://www.accellera.org/activities/vip
- [5] Verification Academy - http://verificationacademy.com
- [6] UVM Cookbook - http://verificationacademy.com/uvm-ovm
- [7] UVM World - http://uvmworld.com
- [8] “Are UVM/OVM Macros Evil? A Cost-Benefit Analysis”; DVCon 2011, Feb 2011. http://verificationacademy.com- /uvm-ovm- /MacroCostBenefit
Copyright
//------------------------------------------------------------//
//   Copyright 2009-2015 Mentor Graphics Corporation          //
//   All Rights Reserved Worldwide                            //
//                                                            //
//   Licensed under the Apache License, Version 2.0 (the      //
//   "License"); you may not use this file except in          //
//   compliance with the License.  You may obtain a copy of   //
//   the License at                                           //
//                                                            //
//       http://www.apache.org/licenses/LICENSE-2.0           //
//                                                            //
//   Unless required by applicable law or agreed to in        //
//   writing, software distributed under the License is       //
//   distributed on an "AS IS" BASIS, WITHOUT WARRANTIES OR   //
//   CONDITIONS OF ANY KIND, either express or implied.  See  //
//   the License for the specific language governing          //
//   permissions and limitations under the License.           //
//------------------------------------------------------------//